

Self-Hosting Guide: Properly Scaling Grafana Mimir in Monolithic Mode
Learn how to scale Grafana Mimir in Monolithic Mode even without Kubernetes and using Azure Container Apps, Consul and Memcached.

Introduction
In many real-world scenarios, there is a lack of reliable examples on how to effectively and stably operate Grafana Mimir in Monolithic Deployment Mode. This becomes particularly challenging when large volumes of metrics from Prometheus environments need to be collected, stored, and queried with high performance without relying on a fully orchestrated microservice architecture like Kubernetes.
This article addresses the self-hosting of Grafana Observability components in Azure, outside of a Kubernetes cluster, for example, in compute resources such as Azure Container Apps or Azure App Services. The focus is on a production-like setup with controlled resource usage, without having to give up the scalability and modularity of the Grafana suite.
At the core of the solution is the Grafana Observability Suite, consisting of modular components that can be operated both individually and in combination:
| Component | Purpose | Typical Use Case |
|---|---|---|
| Grafana | Visualization | Dashboards, alerts, query editor for metrics, logs, and traces |
| Mimir | Storage and querying of metrics | Long-term storage, metrics backend for Prometheus |
| Loki | Centralized log storage | Aggregation and analysis of distributed log data |
| Tempo | Distributed tracing | Analysis of latencies and service dependencies |
| Prometheus | Metric scraping | Collection of time series data via pull mechanism |
| Pushgateway | Push-based metric collection | Submission of short-lived metrics from batch or CI jobs |
| Alloy | Dynamic data collection | Converged agent with configurable pipelines and centralized management |
This article focuses on Grafana Mimir as the central storage system for metrics within the suite. The goal is to present a robust and maintainable architecture that works without Kubernetes, particularly for companies or teams that prefer Azure-native services while still benefiting from Mimir’s capabilities.
Why is Mimir Needed?
The demand for scalable, highly available metric solutions has significantly increased in recent years. Traditional monitoring setups like individual Prometheus instances provide a solid foundation for data collection but quickly reach technical and operational limits. This becomes especially problematic with growing system complexity, increasing query frequencies, or the need for long-term and redundant metric storage.
Grafana Mimir fills exactly this gap as it functions as a central backend for metrics. Mimir enables horizontal scaling, supports redundancy, offers long-term storage for years, and delivers high query performance even with very large datasets.
In combination with Prometheus, Mimir acts as a durable storage solution for Prometheus data. Prometheus itself is intentionally lightweight and not designed for long-term storage, scalability, or fault tolerance. Mimir extends these capabilities, making Prometheus production-ready for enterprise environments. However, Mimir is not just the long-term backend for Prometheus. Data from the Grafana Pushgateway can also be seamlessly integrated into Mimir. Additionally, Alloy can send metrics directly to Mimir, often without an intermediate Prometheus instance.
Thus, Mimir acts as a central aggregation point for almost all quantitative data sources within the Grafana Observability Suite. It therefore stores:
- Regularly scraped metrics from Prometheus instances
- Pushed metrics from Pushgateway processes
- Directly sent metrics from Grafana Agent or Alloy
Through this central role, Mimir provides not only high availability and performance but also a consistent data foundation that reliable visualization, alerting, and analysis can build upon.
Deployment Modes
Grafana Mimir is designed to flexibly adapt to different infrastructures and operating models. Depending on scaling needs, operational experience, and infrastructure requirements, Mimir can be operated in different deployment modes.
Mimir currently supports two official deployment variants. Each of these variants is optimized for specific use cases:
| Mode | Description | Target Audience / Use Case |
|---|---|---|
| Monolithic | All components run in a single process or container. | Simple setup for smaller environments or testing |
| Microservices | Each component is a standalone service, individually scalable. | Highly scalable, production-grade enterprise deployments |
For many production-like, non-Kubernetes-based deployments (e.g., in Azure Container Apps or VMs), the Monolithic Mode offers an ideal balance between simplicity and functionality. In this variant, all core components can be operated with minimal infrastructure, making it ideal for dedicated setups without a complex service mesh.
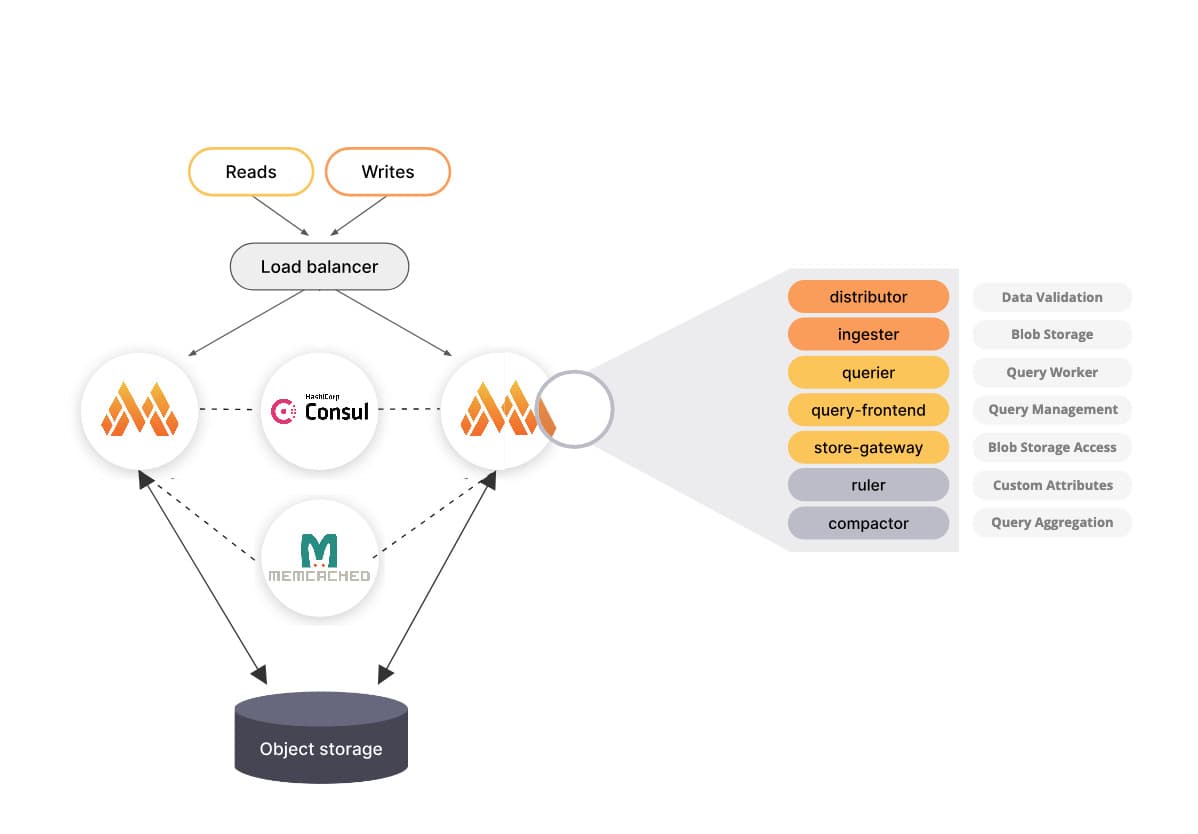
Below is a high-level illustration of the Monolithic Mode:

The Monolithic Mode of Mimir can be horizontally scaled.
The following visualization is also taken from the Mimir documentation.
Later in this blog post, I will present a specific diagram that also integrates the use of Consul and Memcached.

The Microservice Mode is not covered in this blog article, since there are already very good examples and templates available in the context of Kubernetes.
Further resources are provided at the end of the blog post.

Components of Mimir
Regardless of the deployment mode, Mimir is based on a modular architecture. Each component is responsible for a clearly defined task. Below is an overview of the central components and their respective functions.
Ingester
The Ingester is a central component in Mimir's write path. It receives time series data from the Distributor, temporarily stores it in memory, and periodically writes it to the configured object storage. This process allows for an efficient decoupling of ingestion and storage.
The main functions are:
- Data buffering and persistence: The Ingester first stores incoming metrics in memory and periodically writes them as TSDB blocks to object storage. This reduces the write load on long-term storage and improves system performance.
- Replication: To ensure data availability, the Ingester replicates incoming data to multiple instances. This ensures that no data is lost in the event of an instance failure.
- Collaboration with other components: The Ingester works closely with the Distributor, which validates the incoming data and distributes it to the appropriate Ingesters. It also interacts with the Store Gateway to make persisted data available for queries.
- Circuit breakers: To protect the Ingester from excessive load due to slow write or read requests, Mimir implements circuit breakers. These monitor the number of failed requests and can temporarily reject new requests if predefined thresholds are exceeded to ensure system stability.
- Resource-based Read Path Limiting: The Ingester can be configured to limit read requests based on CPU and memory usage. If resource utilization exceeds certain thresholds, new read requests are rejected to prioritize write paths and maintain system stability.
- Spread-Minimizing Token Allocation: To evenly distribute the load, Mimir uses an optimized token assignment strategy in the hash ring. These "Spread-Minimizing Tokens" ensure that the time series data is evenly distributed across the Ingesters, leading to better resource utilization and system performance.
Distributor
The Distributor is a stateless component that receives incoming time series data from Prometheus or Grafana Alloy. It validates the data for correctness and ensures that it is within the configured limits for a specific tenant. It then splits the data into batches and sends them in parallel to multiple Ingesters. The series are distributed across the Ingesters, and each series is replicated according to the configured replication factor. The default replication factor is three.
The main functions are:
- Data validation: Checks incoming data for correctness and adherence to limits.
- Sharding and replication: Distributes data across multiple Ingesters and replicates it according to the replication factor.
- Stateless design: Enables horizontal scaling and simple recovery in case of failures.
Querier
The Querier is also a stateless component that evaluates PromQL expressions by fetching time series and labels in the read path. The Querier uses the Store Gateway component to access the long-term storage and the Ingester component to query recently written data.
The main functions are:
- PromQL evaluation: Executes complex queries over current and historical data.
- Data aggregation: Combines data from different sources for comprehensive analysis.
- Scalability: Supports horizontal scaling to handle high query loads.
Query Frontend
The Query Frontend is a component that receives and optimizes incoming queries. It breaks down long queries into smaller time intervals, checks the query result cache, and uses sharding when necessary to further parallelize the queries. It then places the queries into an in-memory queue from which the Queriers can fetch them for execution.
The main functions are:
- Query optimization: Breaks down long queries and enables parallel processing.
- Caching: Stores query results to reduce latency for repeated queries.
- Queue management: Manages the distribution of queries to Queriers for load balancing.
Query Scheduler (optional)
The Query Scheduler is an optional, stateless component that manages a queue of queries to be executed and distributes the workload across available Queriers.
The main functions are:
- Query distribution: Coordinates the assignment of queries to Queriers.
- Scalability: Enables the scaling of Query Frontends by decoupling the queue.
- Service discovery: Supports DNS and ring-based service discovery for flexible integration.
Compactor
The Compactor improves query performance and reduces the usage of long-term storage by merging blocks.
The main functions are:
- Block compression: Combines multiple blocks for a tenant into an optimized larger block, leading to deduplicated chunks and a reduced index size.
- Bucket index update: Keeps the bucket index per tenant up to date, which is used by Queriers, Store Gateways, and Rulers to discover new and deleted blocks in storage.
- Data retention: Deletes blocks that are outside of a configurable retention period.
Store Gateway
The Store Gateway is a stateful component that retrieves blocks from long-term storage. In the read path, both the Querier and the Ruler use the Store Gateway to handle queries, whether the query originates from a user or as part of rule evaluation.
The main functions are:
- Block query: Retrieves relevant data blocks from long-term storage.
- Index management: Maintains an up-to-date overview of available blocks and their metadata.
- Sharding and replication: Supports horizontal scaling by distributing and replicating blocks across multiple instances.
Ruler
The Ruler is an optional but essential component in Grafana Mimir, responsible for executing recording and alerting rules. It allows for the creation of aggregated metrics and triggering of alerts based on defined conditions.
The main functions are:
- Rule execution: The Ruler executes both recording and alerting rules defined in Prometheus-compatible formats.
- Multi-tenancy: Supports the simultaneous execution of rules for multiple tenants, allowing each tenant to manage their own rule sets.
- Sharding: For horizontal scaling, the Ruler divides rule execution through sharding, distributing rule sets across different Ruler instances.
The Ruler can be configured in two operating modes:
- Internal mode: The default mode, where the Ruler communicates directly with the Ingester and Querier components to read and write data.
- Remote mode: In this mode, the Ruler delegates rule execution to separate Query components, providing better scalability and isolation.
Rule management can be done in various ways:
- HTTP API: Allows the creation, updating, and deletion of rule sets via RESTful endpoints.
- Mimirtool CLI: A command-line tool that provides functions for linting, formatting, and uploading rules.
The Ruler supports different storage backends for rule storage:
- Object storage: Supports Amazon S3, Google Cloud Storage, Azure Blob Storage, and OpenStack Swift.
- Local storage: Reads rules from the local file system; however, this mode is read-only and does not support API-based changes.
Scaling the Monolithic Deployment Mode
The Monolithic Deployment Mode of Grafana Mimir allows all core components to run in a single process or container. This significantly simplifies deployment, especially in environments without Kubernetes or complex orchestration systems.
Although the Monolithic Mode provides a simplified deployment, there is no official production-ready standard configuration for this mode. The official documentation only provides a sample configuration for demonstration purposes, which is not suitable for production use.
The Monolithic Mode is particularly suited for:
- Development and test environments: Quick setup and easy management.
- Smaller production environments: Where scalability and high availability requirements are limited.
- Environments without Kubernetes: Used in traditional VM-based infrastructures or Azure Managed Compute resources.
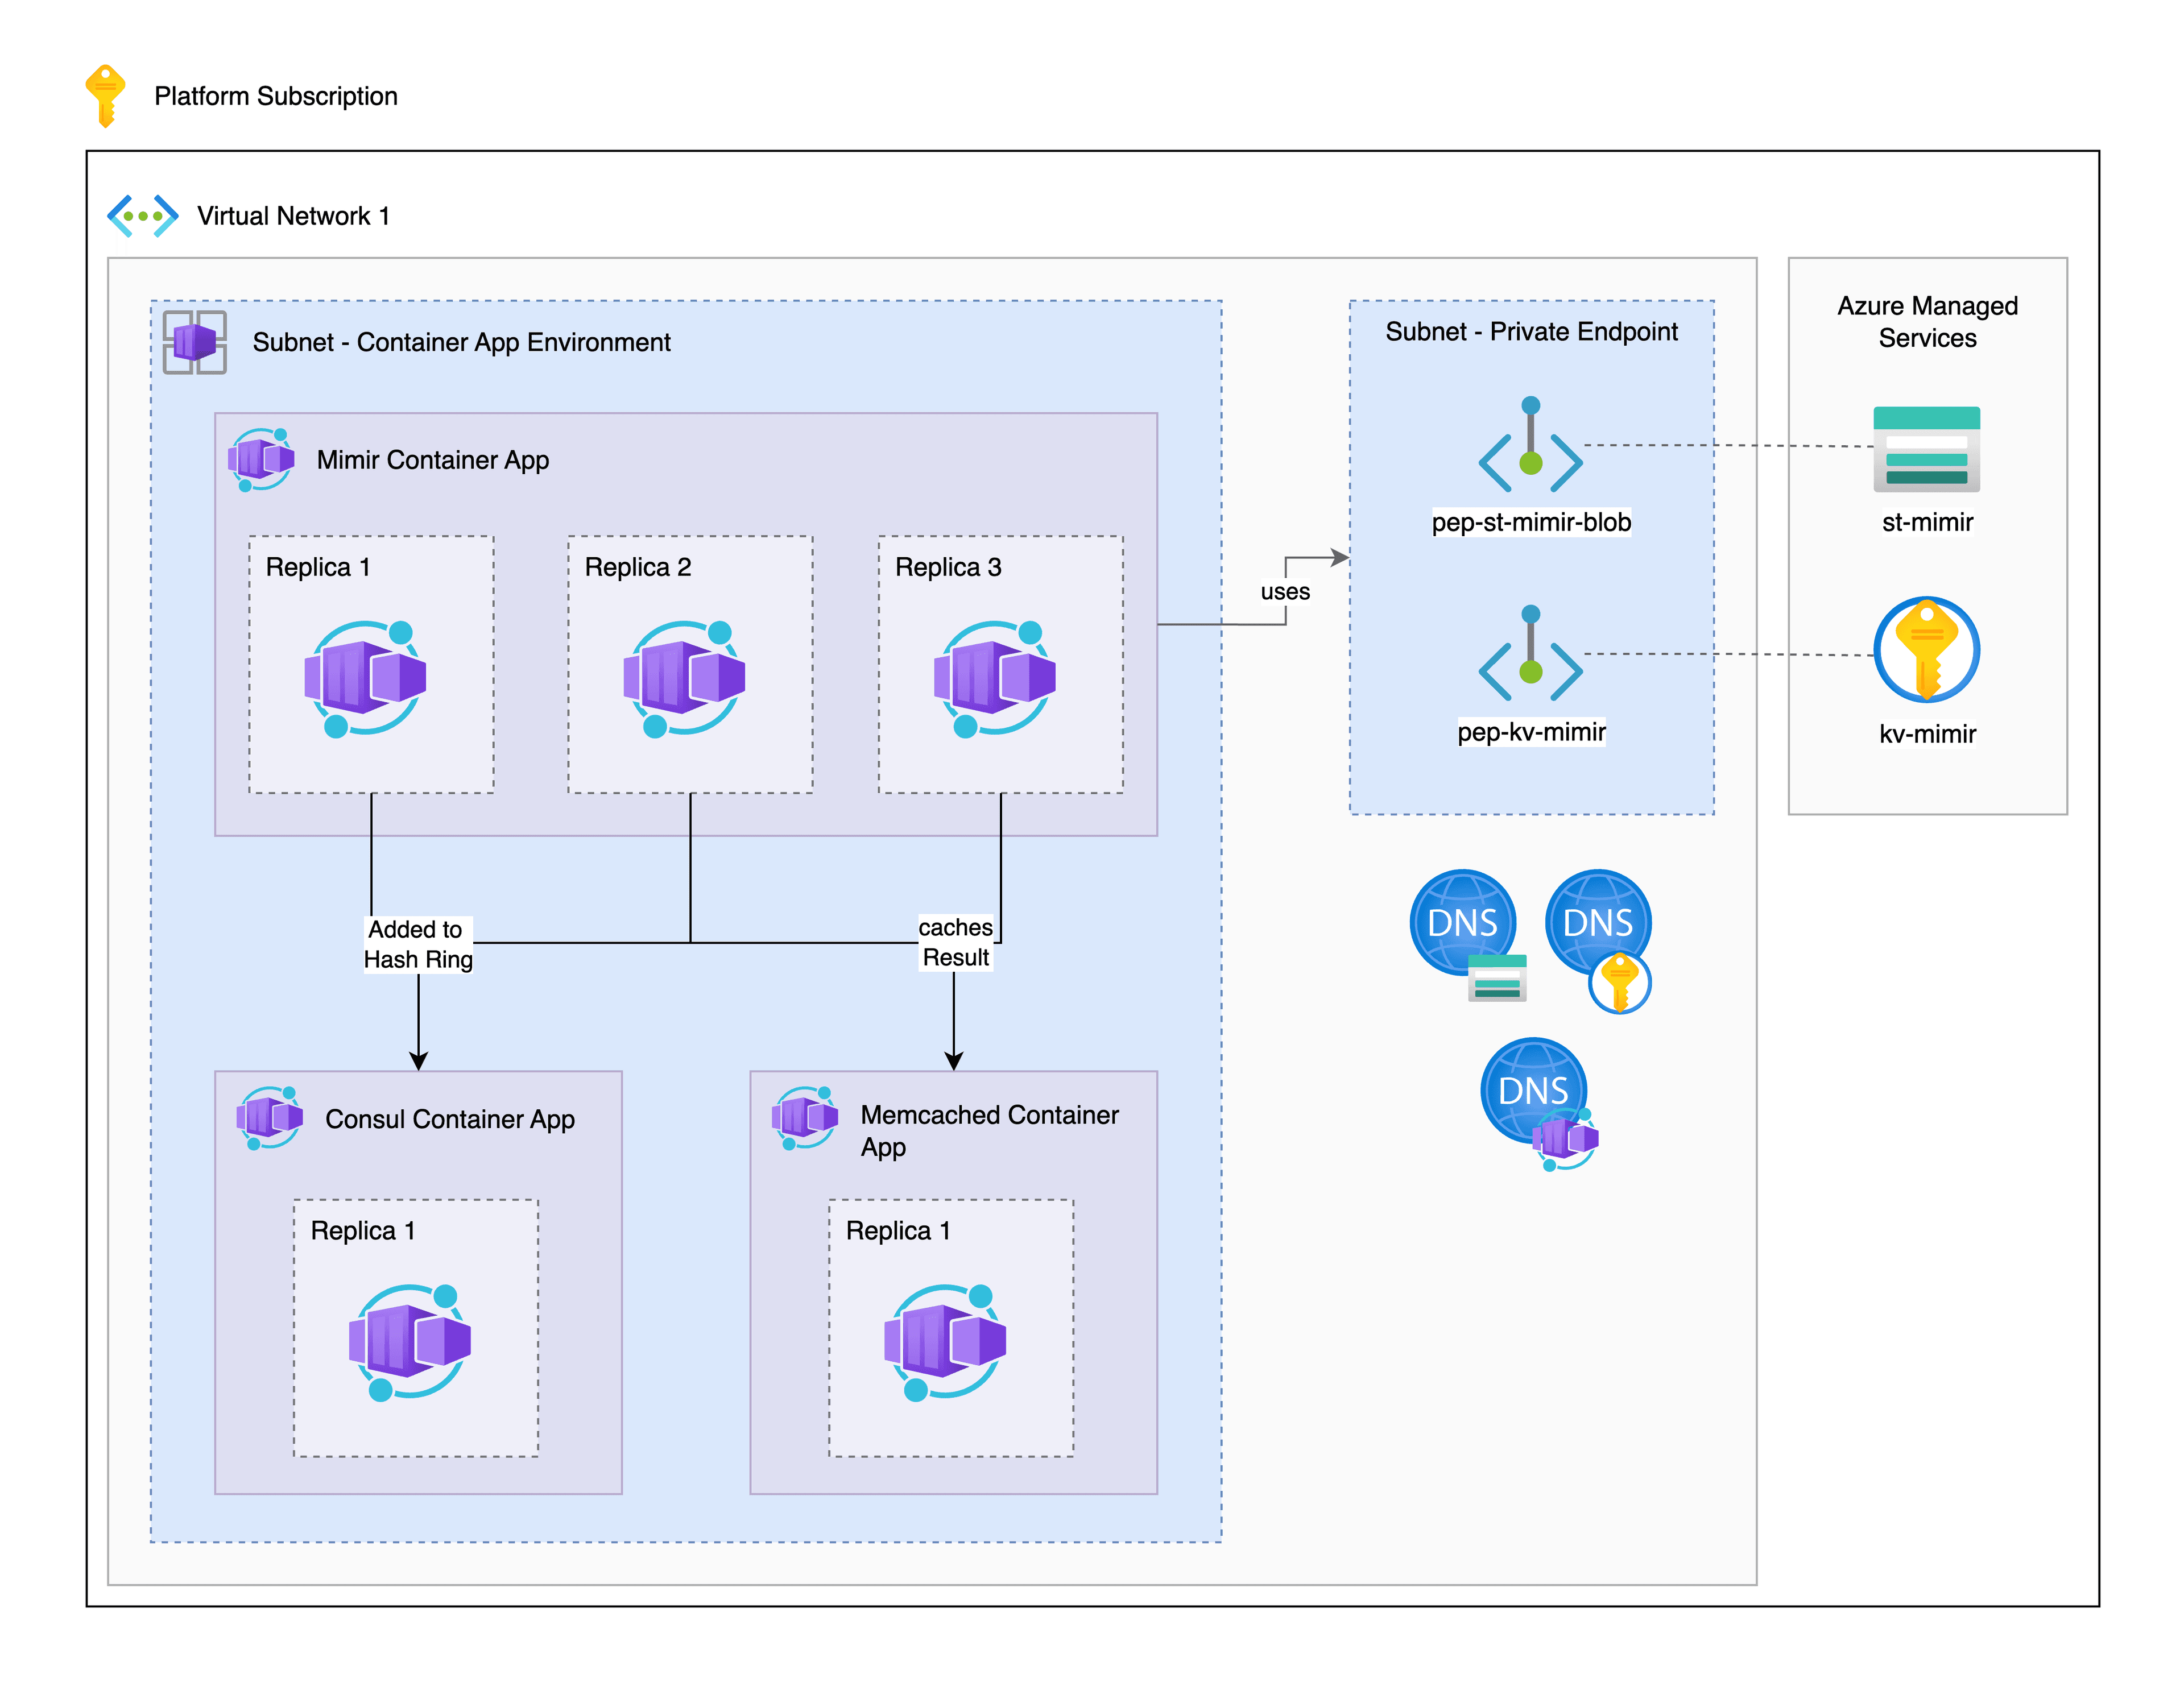
Architecture of Our Mimir Setup
Our Mimir setup consists of a single consolidated container that includes all central Mimir components, such as the Distributor, Ingester, Querier, Store Gateway, Ruler, Compactor, Alertmanager, Query Frontend, and Scheduler. This architecture allows us to run Mimir in containerized Azure platforms like Azure Container Apps or App Services.
To support high availability and performance for the monolith, we rely on the following additional services and components:
- Azure Blob Storage: Serves as the central object storage for all persisted metrics, Alertmanager data, and Ruler states. Mimir uses dedicated containers for different data classes (Blocks, Alertmanager, Ruler).
- Memcached (Self-Hosted): Integrated to accelerate metadata, chunk, and index cache access, as well as Query Result and Ruler caches. Caching at the application level reduces the load on Blob Storage and improves response times for complex PromQL queries.
- Consul (Self-Hosted): Acts as the central key-value store backend for all sharding and ring structures in Mimir. Components like the Ingester, Store Gateway, Alertmanager, or Query Scheduler use Consul for service discovery, load balancing, and replication control.
The individual Mimir components run together in a single container process, communicate via local interfaces, and coordinate through consistent hash rings managed by Consul. Persistent data streams, such as time series write operations and rule recording outputs, are stored in Azure Blob Storage. Memcached's cache ensures that repeated access to the same data is efficiently handled. The query paths are designed so that the Query Frontend splits, distributes, and organizes incoming requests via the Query Scheduler. The scheduler identifies different query types and ensures optimal resource distribution.
Benefits of this setup:
- Compact operation without complex orchestration or distributed service networks
- Scalable performance through caching, sharding, and decoupling of storage and compute
- Azure-native integration using Blob Storage, containerized deployment, and service discovery via external, Azure-compatible tools
- Easy maintenance and upgrades, as all components are bundled in a single process
This architecture is particularly suitable for teams or organizations that:
- Do not run a Kubernetes infrastructure but still want to implement modern observability solutions
- Have a manageable number of metric producers (e.g., via Prometheus, Pushgateway, Grafana Agent, or Alloy)
- Require a cost-effective but production-ready monitoring backend
- Run all their workloads fully within Azure and prefer container solutions there
In the following diagram, our final setup is depicted. We use multiple Mimir instances in Monolithic Mode and coordinate them through a dedicated Consul instance.
To cache recurring queries and data, we also integrate Memcached into our setup.
Configuration of the Container App Environment
In this blog post, we deploy three different Container Apps within a Container App Environment. We deploy one Container App each for Consul, Memcached, and Mimir. By configuring replicas, we can later adjust the required resources either with scaling rules or by setting a fixed number of Mimir instances.
To successfully implement our setup, we deploy a Container App Environment and a Private Endpoint subnet in our VNet to securely and directly access the Key Vault and Storage Account for our Mimir Container App via the Azure Backbone.
Deployment of Support Resources
In order to successfully deploy our setup, I will now go into the respective configurations and Dockerfiles. For Memcached and Consul, I am using the minimal configuration for demonstration purposes. Please consider for your individual setup whether you want to use Memcached or Consul and which Mimir features you actually need.
The Dockerfiles in this blog post already include some CVE fixes; however, new CVEs may have been added to the Dockerfiles since then.
Therefore, please check for new findings before deploying in a production environment. You can use the command trivy image (add image-sha here) for this.
Deployment of Memcached
In this setup, we use a compact Memcached Dockerfile where we expose port 11211 for Memcached.
FROM memcached:latest

EXPOSE 11211
CMD ["memcached"]
Deployment of Consul
For using Consul, I have provided a custom image instead of the public image, as the latest image on Docker Hub unfortunately includes some critical findings. This custom image is based on the generic Dockerfile from the HashiCorp Consul repository. -> Link to reference
If you do not wish to use a custom image and the critical findings are not relevant to you, feel free to use the official Consul image. Just make sure to expose ports 8301 and 8500.
# Dockerfile for Consul 1.20.6

FROM alpine:3.21 AS builder

# Consul version
ARG VERSION=1.20.6

# HashiCorp Releases URL
ENV HASHICORP_RELEASES=https://releases.hashicorp.com

# Install necessary packages
RUN apk add --no-cache \
    ca-certificates \
    curl \
    dumb-init \
    gnupg \
    libcap \
    su-exec \
    iputils \
    jq \
    libc6-compat \
    openssl \
    iptables \
    tzdata \
    unzip

# Create consul user and group
RUN addgroup consul && adduser -S -G consul consul

# Download and verify Consul binary
RUN set -eux; \
    apkArch="$(apk --print-arch)"; \
    case "${apkArch}" in \
        aarch64) consulArch='arm64' ;; \
        armhf) consulArch='arm' ;; \
        x86) consulArch='386' ;; \
        x86_64) consulArch='amd64' ;; \
        *) echo >&2 "error: unsupported architecture: ${apkArch}" && exit 1 ;; \
    esac; \
    mkdir -p /tmp/build; \
    cd /tmp/build; \
    curl -O ${HASHICORP_RELEASES}/consul/${VERSION}/consul_${VERSION}_linux_${consulArch}.zip; \
    curl -O ${HASHICORP_RELEASES}/consul/${VERSION}/consul_${VERSION}_SHA256SUMS; \
    curl -O ${HASHICORP_RELEASES}/consul/${VERSION}/consul_${VERSION}_SHA256SUMS.sig; \
    gpg --keyserver keyserver.ubuntu.com --recv-keys C874011F0AB405110D02105534365D9472D7468F; \
    gpg --batch --verify consul_${VERSION}_SHA256SUMS.sig consul_${VERSION}_SHA256SUMS; \
    grep consul_${VERSION}_linux_${consulArch}.zip consul_${VERSION}_SHA256SUMS | sha256sum -c; \
    unzip consul_${VERSION}_linux_${consulArch}.zip; \
    cp consul /bin/consul; \
    cd /; \
    rm -rf /tmp/build; \
    gpgconf --kill all; \
    apk del gnupg openssl; \
    rm -rf /root/.gnupg

# Tiny smoke test
RUN consul version

# Final minimal image
FROM alpine:3.21

LABEL org.opencontainers.image.authors="Consul Team <consul@hashicorp.com>" \
      org.opencontainers.image.url="https://www.consul.io/" \
      org.opencontainers.image.documentation="https://www.consul.io/docs" \
      org.opencontainers.image.source="https://github.com/hashicorp/consul" \
      org.opencontainers.image.version="1.20.6" \
      org.opencontainers.image.vendor="HashiCorp" \
      org.opencontainers.image.title="consul" \
      org.opencontainers.image.description="Consul is a datacenter runtime..."

# Install runtime dependencies
RUN apk add --no-cache \
    dumb-init \
    libc6-compat \
    iptables \
    tzdata \
    ca-certificates \
    iputils \
    libcap \
    su-exec \
    jq

# Create consul user and group
RUN addgroup consul && adduser -S -G consul consul

# Copy consul binary
COPY --from=builder /bin/consul /bin/consul

# Setup required directories
RUN mkdir -p /consul/data /consul/config && \
    chown -R consul:consul /consul

VOLUME /consul/data

# Ports
EXPOSE 8300 8301 8301/udp 8302 8302/udp 8500 8600 8600/udp

# Set up nsswitch.conf for Go's netgo DNS
RUN test -e /etc/nsswitch.conf || echo 'hosts: files dns' > /etc/nsswitch.conf

# Copy entrypoint
COPY docker-entrypoint.sh /usr/local/bin/docker-entrypoint.sh
RUN chmod +x /usr/local/bin/docker-entrypoint.sh

ENTRYPOINT ["docker-entrypoint.sh"]

CMD ["agent", "-dev", "-client", "0.0.0.0"]
# docker-entrypoint.sh

#!/bin/sh
set -e

# If running as root, run Consul as the consul user
if [ "$(id -u)" = '0' ]; then
    exec consul "$@"
fi

exec "$@"
The Mimir Components Used
In this chapter, I would like to explain how the central configuration for operating Grafana Mimir in the Monolithic Deployment Mode can be implemented on an Azure-based infrastructure. I will first explain the individual configuration parameters.
Common Storage Configuration (common.storage)
All persistent data is stored via Azure Blob Storage. Here, the object storage is explicitly defined as the backend. The configuration includes:
- Account Name and Key: Authentication to Azure Blob Storage.
- Endpoint Suffix: Specifies the Azure endpoint (blob.core.windows.net).
This allows Mimir to store large amounts of time-series data permanently and reliably in Azure without requiring local storage.
Block Storage Configuration (blocks_storage)
This section specifies where Mimir stores time-series data and how it efficiently caches them:
- Container Name: All TSDB blocks are written to the Azure container
mimirblocks. - Caches (Index, Chunks, Metadata):
- Use of Memcached as a cache backend.
- Separate configuration for Index Cache, Chunk Cache, and Metadata Cache.
- Max sizes and timeouts are configured to ensure high cache efficiency.
The caching layer significantly reduces access load to Azure Blob Storage and ensures lower latency for queries.
Alertmanager Storage (alertmanager_storage)
The state of the Alertmanager (active alerts, silences, etc.) is also persisted. This ensures that alerts are retained across container restarts:
- Use of Azure Container:
mimir-alertmanager
Ruler Storage (ruler_storage)
For storing recording and alerting rules, a separate container in Azure is used:
- Azure Container:
mimir-ruler - Cache for Ruler Queries: Again, Memcached is used to accelerate rule evaluation.
This ensures that rule states and results remain consistent and efficiently accessible over longer periods of time.
Server Settings (server)
- Log Level:
debug, to view comprehensive information during operation and for troubleshooting. - HTTP Listen Port: 9009 is the default port for all internal and external API endpoints of Mimir. We will need this API later.
Multitenancy
In this setup, Mimir is operated as single-tenant, meaning there is no tenant isolation. This configuration is deliberately chosen as it reduces complexity in many Azure environments and allows simpler user and query management.
- Multitenancy Disabled:
multitenancy_enabled: false
Limits
- Cache Unaligned Requests: Enabled, to fall back on caching mechanisms even with incomplete indexed data, thereby improving system performance.
Sharding and Ring Management
All sharding-capable components (e.g., Alertmanager, Compactor, Distributor, Ingester, Store Gateway, Query Scheduler, Ruler) use:
- Consul as the central key-value backend.
- Service Discovery through ring management.
This ensures that Mimir can implement real load balancing even in the monolithic mode and can absorb failures of individual components.
Frontend Optimizations (frontend)
The query frontend is configured to process requests as efficiently as possible:
- Split Queries by Interval: Automatically splits large time-range queries into smaller sub-queries.
- Sharding active Series Queries: Enabled for better load distribution.
- Parallelization of sharded queries: To further reduce query latency.
- Results Cache: Caches query results via Memcached to offload the querier processes.
This configuration is crucial for fast and resource-efficient processing of large PromQL queries, especially with high user activity.
Mimir Configuration
To configure Mimir as described in the previous chapter, we need to create a mimir.yml file. For using Azure Blob Storage, Consul, and Memcached, you can use the following configuration.
# mimir.yml
---
common:
  storage:
    backend: azure
    azure:
      account_key: AZURE_ACCOUNT_KEY
      account_name: AZURE_ACCOUNT_NAME
      endpoint_suffix: "blob.core.windows.net"
blocks_storage:
  azure:
    container_name: "mimirblocks"
  bucket_store:
    index_cache:
      backend: "memcached"
      memcached:
        addresses: AZURE_MEMCACHED_FQDN
        max_item_size: 5242880
        timeout: 5s
    chunks_cache:
      backend: "memcached"
      memcached:
        addresses: AZURE_MEMCACHED_FQDN
        max_item_size: 1048576
        timeout: 5s
    metadata_cache:
      backend: "memcached"
      memcached:
        addresses: AZURE_MEMCACHED_FQDN
        max_item_size: 1048576

alertmanager_storage:
  azure:
    container_name: "mimir-alertmanager"

ruler_storage:
  azure:
    container_name: "mimir-ruler"
  cache:
    backend: "memcached"
    memcached:
      addresses: AZURE_MEMCACHED_FQDN


server:
  log_level: debug
  http_listen_port: 9009

multitenancy_enabled: false

limits:
  cache_unaligned_requests: true

alertmanager:
  sharding_ring:
    kvstore:
      store: consul
      consul:
        host: AZURE_CONSUL_FQDN

compactor:
  sharding_ring:
    kvstore:
      store: consul
      consul:
        host: AZURE_CONSUL_FQDN

frontend:
  split_queries_by_interval: 12h
  shard_active_series_queries: true
  parallelize_shardable_queries: true
  additional_query_queue_dimensions_enabled: true
  cache_results: true
  results_cache:
    backend: "memcached"
    memcached:
      addresses: AZURE_MEMCACHED_FQDN
      max_item_size: 1048576
      timeout: 5s

query_scheduler:
  service_discovery_mode: "ring"
  additional_query_queue_dimensions_enabled: true
  ring:
    kvstore:
      store: consul
      consul:
        host: AZURE_CONSUL_FQDN

distributor:
  ring:
    kvstore:
      store: consul
      consul:
        host: AZURE_CONSUL_FQDN

ingester:
  ring:
    kvstore:
      store: consul
      consul:
        host: AZURE_CONSUL_FQDN

store_gateway:
  sharding_ring:
    kvstore:
      store: consul
      consul:
        host: AZURE_CONSUL_FQDN

ruler:
  ring:
    kvstore:
      store: consul
      consul:
        host: AZURE_CONSUL_FQDN
In our mimir.yml file, we have several placeholders such as AZURE_ACCOUNT_KEY, AZURE_ACCOUNT_NAME, AZURE_MEMCACHED_FQDN, and AZURE_CONSUL_FQDN. We want to dynamically insert these parameters into the mimir.yml using environment variables. For this, there is a startup.sh script that incorporates these parameters.
In the startup script, the Nginx load balancer is also started alongside the Mimir instance.
One aspect that might cause you a lot of frustration in this setup is the default behavior when starting Mimir.
Typically, you can use the flag -target=all to start all required Mimir components. However, this flag is misleading,
as not all components are actually started.
This issue is described in detail in the following -> GitHub Issue. The issue has been known for some time, and more details can also be found in -> this thread.
The GitHub issue describes all the components that are started with the flag -target=all as follows:
Modules marked with * are included in target All:
alertmanagerallcompactor *distributor *flusheringester *overrides-exporterpurger *querier *query-frontend *query-schedulerruler *store-gateway *
In our setup, we also want to use the query-scheduler component, and therefore we explicitly enable it in the startup script.
# startup.sh
#!/bin/sh

echo "YAML file update started."

yaml_file="/etc/mimir/mimir.yml"

if [ -z "$AZURE_ACCOUNT_KEY" ]; then
  echo "ERROR: AZURE_ACCOUNT_KEY environment variable is not set or empty."
  exit 1
fi

if [ -z "$AZURE_ACCOUNT_NAME" ]; then
  echo "ERROR: AZURE_ACCOUNT_NAME environment variable is not set or empty."
  exit 1
fi

if [ -z "$AZURE_CONSUL_FQDN" ]; then
  echo "ERROR: AZURE_CONSUL_FQDN environment variable is not set or empty."
  exit 1
fi

if [ -z "$AZURE_MEMCACHED_FQDN" ]; then
  echo "ERROR: AZURE_MEMCACHED_FQDN environment variable is not set or empty."
  exit 1
fi

sed -i "s/AZURE_ACCOUNT_KEY/$(echo "$AZURE_ACCOUNT_KEY" | sed 's/[\/&]/\\&/g')/g" "$yaml_file"
sed -i "s/AZURE_ACCOUNT_NAME/$(echo "$AZURE_ACCOUNT_NAME" | sed 's/[\/&]/\\&/g')/g" "$yaml_file"
sed -i "s/AZURE_CONSUL_FQDN/$(echo "$AZURE_CONSUL_FQDN" | sed 's/[\/&]/\\&/g')/g" "$yaml_file"
sed -i "s/AZURE_MEMCACHED_FQDN/$(echo "$AZURE_MEMCACHED_FQDN" | sed 's/[\/&]/\\&/g')/g" "$yaml_file"

echo "YAML file updated with environment variables."

echo "*** 1. Starting Nginx ***"
nginx

echo "*** 2. Starting Mimir ***"
/bin/mimir -config.file=/etc/mimir/mimir.yml -target=all,query-scheduler
In this setup, Mimir is secured using Basic Authentication. To do this, you need to adjust your nginx.conf file accordingly and set the respective username and your password encrypted in Base64. In this example, we are using an htpasswd file, but in a production environment, you should manage these sensitive data from a Key Vault and reference them as environment variables in the Dockerfile.
For this section, you can use the usual Nginx templates. In this setup, traffic is always first routed through Nginx to the Mimir port. This ensures that only authenticated users can access our Mimir instance.
# Mimir Dockerfile
FROM alpine:3.21.3 AS builder

# Stage 1: Copy configruation files into Build-Image
COPY startup.sh /etc/startup.sh
COPY mimir.yml /etc/mimir/mimir.yml
COPY nginx.conf /etc/nginx/nginx.conf
COPY htpasswd /etc/nginx/authnginx/htpasswd

RUN apk update && \
apk add --no-cache nginx bash curl && \
chmod +x /etc/startup.sh

# Stage 2: Extract Mimir Binary from the initial Build Image
FROM grafana/mimir:2.15.2 AS mimir-binary

# Stage 3: Configure final Image including Nginx and Mimir
FROM alpine:3.21.3

RUN apk update && \
apk add --no-cache nginx bash curl

COPY --from=builder /etc/startup.sh /etc/startup.sh
COPY --from=builder /etc/mimir/mimir.yml /etc/mimir/mimir.yml
COPY --from=builder /etc/nginx/nginx.conf /etc/nginx/nginx.conf
COPY --from=builder /etc/nginx/authnginx/htpasswd /etc/nginx/authnginx/htpasswd

COPY --from=mimir-binary /bin/mimir /bin/mimir

RUN chmod +x /etc/startup.sh
USER 0

EXPOSE 9010

ENTRYPOINT ["/etc/startup.sh"]
Deployment of Mimir
Now that we have prepared all the essential components for the deployment, I would like to present my recommendation for the deployment order.
Step 1: Deploy the required Azure infrastructure components
According to our architecture diagram, you should already have deployed the VNet, including the necessary resources such as subnets, container app environments, private endpoints, storage accounts, and key vaults.
Step 2: Deploy Memcached
As the first resource in our setup, you should deploy Memcached, as it has no hard dependencies and can be deployed independently of the other resources. During the Mimir deployment, you will need to reference the FQDN of the Memcached container app, so ideally, it should already exist.
Step 3: Deploy Consul
Consul is our basis for the Mimir Hashring. With this hashring, we know at any given time how many Mimir instances are available. The individual Mimir components of each replica also coordinate via this hashring provided by Consul.
As with Memcached, we must also reference the FQDN of the Consul container app before starting the Mimir instances. Therefore, Consul should be accessible before starting Mimir.
Step 4: Deploy Mimir
Now, we can start deploying Mimir. As indicated by the startup script for Mimir, you will need to reference the FQDN of Memcached, Consul, the storage account, and possibly your key vault.
The uniqueness of this Mimir setup is that you can define the number of replicas for your Mimir container app based on your requirements. In our example, we planned for three replicas. You don’t need to deploy three different Mimir container apps with different FQDNs, but you can use the replica feature, and the replicas will be registered in the Consul hashring. Each replica can then divide the workload between all replicas. If you experience performance spikes in the future or want to dynamically increase the number of Mimir replicas, you can adjust the number of replicas using the container apps scaling rules.
Problems with Mimir - Too many unhealthy instances in the ring
After the full deployment of Mimir and its associated support components, we are essentially done, but there are still issues in the monolithic deployment that need to be proactively addressed.
The Redeployment Problem
In distributed systems like Grafana Mimir, the reliability of the nodes is crucial for the stability of the entire system. A well-known problem arises when containers crash or are restarted in environments like Azure Container Apps.
The associated instances remain marked as unhealthy in the hashring (or memberlist). This can result in distributors, ingesters, or other Mimir components malfunctioning or even stopping the entire data flow, even though enough healthy nodes may be available.
Administrators would then have to manually intervene using the Mimir API to remove the dead entries in the ring. This is a very error-prone and time-consuming process, especially in larger clusters or with frequent deployments.
The Grafana community suggests implementing a feature that automatically forgets unhealthy members in the hashring after a defined period. Grafana Loki already successfully implemented a similar feature.
Unfortunately, this feature currently only exists for distributors, so for all other Mimir components, the unhealthy instances need to be removed from the hashring using the Mimir API. If these faulty or outdated Mimir instances are not removed from the hashring, it can cause issues where queries cannot be executed in Grafana.
Implementing Your Own Automated Solution
To solve this problem, I would like to provide a script in this chapter. You can use this script in GitLab or GitHub as part of a scheduled job to continuously ensure that all Mimir components are functioning reliably.
#!/bin/bash

# Function to check the Mimir Health Status
check_health() {
  echo "Checking Mimir's Health Status..."
  # Send an HTTP request to the /ingester/ring endpoint and store the HTTP status code
  http_status=$(curl -s -o /dev/null -w "%{http_code}" \
                -u "$MIMIR_USERNAME:$MIMIR_PASSWORD" "$AZURE_MIMIR_FQDN/ingester/ring")

  if [ "$http_status" -eq 200 ]; then
    echo "Health Status is OK. HTTP Status: 200"
    return 0
  else
    echo "Health Status failed. HTTP Status: $http_status"
    return 1
  fi
}

# Define the maximum wait time and the interval for repeated checks
max_wait_time=240   # Maximum wait time in seconds
check_interval=30   # Interval between checks in seconds
elapsed_time=0      # Time already elapsed

# While loop to wait for a healthy Mimir Health Status
while [ $elapsed_time -lt $max_wait_time ]; do
  if check_health; then
    echo "Mimir Health Status is OK."
    break
  else
    echo "Mimir Health Status is not OK. Retrying in $check_interval seconds..."
    sleep $check_interval
    elapsed_time=$((elapsed_time + check_interval))
  fi
done

# If Mimir does not become healthy within the maximum wait time, exit the script
if [ $elapsed_time -ge $max_wait_time ]; then
  echo "Mimir did not become healthy within the expected time. Exiting script."
  exit 1
fi

echo "*** Starting Forget Script for unhealthy Mimir instances. ***"

# Get the current status of the Ingester Ring
response=$(curl -s -u "$MIMIR_USERNAME:$MIMIR_PASSWORD" "$AZURE_MIMIR_FQDN/ingester/ring")

# Extract the section with unhealthy instances
unhealthy_section=$(echo "$response" | grep -A 8 'UNHEALTHY') || unhealthy_section=""

if [ -n "$unhealthy_section" ]; then
  # Search for instance names starting with "ca-" and clean up the output
  unhealthy_instances=$(echo "$unhealthy_section" | grep -o 'ca-.*' | \
                        sed 's/" type="submit">Forget<\/button>//')

  if [ -n "$unhealthy_instances" ]; then
    echo "Unhealthy instances found:"
    echo "$unhealthy_instances"
  else
    echo "No instances found with prefix 'ca-'"
  fi
else
  echo "No unhealthy instances found in the response."
fi

# If no unhealthy instances were found, exit the script
if [ -z "$unhealthy_instances" ] || [ "$unhealthy_instances" = "" ]; then
  echo "No unhealthy instances found."
  exit 0
fi

# For each unhealthy instance, send the Forget request to various components
for instance in $unhealthy_instances; do
  echo "Deleting unhealthy instance: $instance"
  curl -s -u "$MIMIR_USERNAME:$MIMIR_PASSWORD" "$AZURE_MIMIR_FQDN/ingester/ring" -d "forget=$instance"
  curl -s -u "$MIMIR_USERNAME:$MIMIR_PASSWORD" "$AZURE_MIMIR_FQDN/distributor/ring" -d "forget=$instance"
  curl -s -u "$MIMIR_USERNAME:$MIMIR_PASSWORD" "$AZURE_MIMIR_FQDN/store-gateway/ring" -d "forget=$instance"
  curl -s -u "$MIMIR_USERNAME:$MIMIR_PASSWORD" "$AZURE_MIMIR_FQDN/compactor/ring" -d "forget=$instance"
  curl -s -u "$MIMIR_USERNAME:$MIMIR_PASSWORD" "$AZURE_MIMIR_FQDN/query-scheduler/ring" -d "forget=$instance"
done

echo "All unhealthy instances successfully deleted."
With this mechanism, your Mimir instances should work reliably, and even in the case of redeployment or reducing the number of required Mimir instances, availability should still be ensured.
If you want to learn more about this issue, I recommend this GitHub issue. -> Link to Github-Issue
My Conclusion on Scaling the Monolithic Mode
With this, I would like to conclude this somewhat lengthy blog post with my final thoughts. Mimir is an essential next step in making your metrics from Prometheus, Pushgateway, etc., available long-term.
By reading this blog post, you should now understand that Mimir does not necessarily require the Microservice Deployment Mode and can still benefit from multiple Mimir instances. Of course, Mimir is not perfect and still has some teething problems at the moment. Nonetheless, it may still be worth considering the use of Mimir.
However, since I specialize particularly in Azure-native solutions, I will present an Azure-native solution in my next blog post. This will use the Log Analytics Workspace with Custom Data Collection Rules and Endpoints as an effective alternative to Mimir for Grafana data. The advantage here is clearly the performance, as the Log Analytics Workspace is serverless, and in my opinion, Azure handles the aggregation, provisioning, and querying of metrics and logs more efficiently than Mimir. For an equally performant Mimir setup, I would need a high number of Mimir instances, which would not be justifiable purely for cost reasons.
Helpful Links for Further Research
- Mimir Deployment Modes: https://grafana.com/docs/mimir/latest/references/architecture/deployment-modes/
- Components of Mimir: https://grafana.com/docs/mimir/latest/get-started/about-grafana-mimir-architecture/
- Mentioned GitHub Issues: